


The straw-and-stapler method is the fastest way to rethread a drawstring, often done in under a minute. No straw handy? A safety pin or bodkin works almost as well and is the classic backup. If your cord is gone for good, a replacement lace or a hoodie built with easy-access channels solves the problem permanently.
TL;DR:
- The straw-and-stapler method is the fastest rethreading technique, often completed in under a minute and resistant to fabric snagging.
- A safety pin or bodkin provides a reliable backup tool with slightly slower speed but better for delicate fabrics and narrow channels.
- Choosing the correct replacement cord involves matching length, diameter, and material to the original, with heat-fusing tips for thicker cords for smooth passage.
- Reinforcing cord ends with knots or cord locks prevents the drawstring from slipping back into the hood during use and washing.
- Some hoodie designs with reinforced channels and security stitches significantly reduce the need for frequent rethreading, favoring long-term durability over quick fixes.
Table of Contents
- How to replace a hoodie drawstring: tools and supplies you need
- Quick method: straw plus stapler for fast rethreading
- Classic method: rethreading with a safety pin or bodkin
- Other tools that work: cable, coat hanger, paperclip, or pen
- How to choose and prep a replacement drawstring
- Full walkthrough: replacing a lost drawstring start to finish
- How to secure the string so it doesn’t get lost again
- When the channel itself needs repair
- Author perspective and field notes from Plaid Gorilla Golf
- What actually matters when your drawstring goes missing
- Get a hoodie built so you rarely need this guide again
- Sources
- FAQ
How to replace a hoodie drawstring: tools and supplies you need
Before you touch the hoodie, get everything within reach. Half the frustration with drawstring repair comes from stopping halfway through to hunt for scissors.
Here is what covers nearly every rethreading job:
- A plastic drinking straw and a stapler (the fastest combo)
- A large safety pin, sewing needle, or bodkin
- A paperclip, wire coat hanger, or an old charging cable as backups
- Scissors, tape, and a lighter (for synthetic cord ends)
- The replacement cord itself, if the original is gone or frayed
If you’re buying a new cord, decide between round and flat styles, and cotton versus paracord, before you start threading. Cord locks are worth grabbing too if your hoodie never had one.
Give the hoodie’s drawstring channel a quick look for lint, bunched fabric, or a snag before you begin. If you’re using a new cord, pre-washing it along with the garment clears off sizing residue that can catch on your tool mid-thread.
Quick method: straw plus stapler for fast rethreading
This is the fix we’d reach for first, every time. It takes less time than tying your shoes, and it rarely snags.
- Flatten one end of a plastic straw and slide 2 to 3 centimetres of the cord’s end inside it.
- Staple through the flattened straw and cord together, once or twice, so the cord can’t pull free.
- Feed the straw’s opposite end into one eyelet and push it through the channel, bunching the fabric toward you as you go rather than pulling the straw straight through empty air.
- Once the straw pokes out the second eyelet, pull the cord the rest of the way and remove the staple.
The straw’s rigidity is the whole trick. It’s easier to feel through fabric and less likely to catch on internal seams than a floppy cord on its own, which is why this method regularly beats the safety-pin approach on time.
If the straw bends or kinks partway through, back it up an inch and reposition your bunching hand closer to the tip. A too-tight channel usually means lint buildup. Pull the straw back out and run a finger through the channel first.
Pro Tip: Use a smoothie straw instead of a standard one. The wider diameter resists bending inside thicker, double-layer hoods.
Classic method: rethreading with a safety pin or bodkin
Before straws became the internet’s favourite hoodie hack, a large safety pin or bodkin was the standard fix, and it still gets the job done reliably.
- Fold the cord’s end over about a centimetre and pin it shut, or wrap a small piece of tape around the tip so it can’t unravel.
- Push the closed pin into one eyelet, sharp end first, keeping the point angled slightly away from the fabric.
- Pinch the fabric around the pin through the outside of the hood and slide it forward in small bunches, rather than trying to shove it straight through.
- Work the pin out the far eyelet, then pull the cord through and unpin it.
Switch to a bodkin or a blunt sewing needle if the hoodie fabric is delicate or the channel is unusually narrow. A bodkin’s smooth, rounded shape is gentler on tight seams than a pin’s sharp point.
Pro Tip: Keep the pin’s point facing outward through the whole slide. A pin angled into the fabric will snag or puncture the channel lining.
Go slowly near the hood’s centre seam. That’s where extra layers of fabric bunch together, and where a rushed pull is most likely to tear the lining.
Other tools that work: cable, coat hanger, paperclip, or pen
No straw, no pin? A few household items will finish the job almost as fast.
- Charging cable: Tie the drawstring’s end to one tip of the cable, feed the other end through the channel, and pull the cable back out to drag the cord with it. Skip the connector end of the cable; its shape catches on eyelets and can crack the plastic housing.
- Wire coat hanger: Straighten it and bend a small hook at one end to make a makeshift fid. This is the tool of choice for thicker paracord that won’t fit through a straw.
- Paperclip: Unbend it into a long hook. Works fine on thin cotton cord, but it flexes too much for anything heavier.
- Pen with a removable clip: The clip alone can hook a thin cord, though it’s the least reliable option here and best treated as a last resort.
How to choose and prep a replacement drawstring
Match the new cord to what came out of the hoodie, not to whatever’s closest on the shelf. A cord that’s too thick binds in the channel; one too thin slides loose and bunches.
- Length: Measure the old cord if you still have it. Most adult hoodies use 100 to 140 centimetres, enough to tie a bow with both ends even.
- Diameter: Match the width to the original so the cord glides through the channel without snagging or rattling loose.
- Material: Flat cotton cord suits lightweight hoodies and matches the softer feel of the fabric. Round polyester or paracord holds up better on heavier, double-layer hoods. Elastic cord works only if the original design used it, since it won’t cinch the same way a static cord does.
If you go with paracord, finish the cut ends with a lighter to fuse the strands, or slide on a length of heat-shrink tubing to create a stiff, temporary aglet. That stiff tip is what lets the cord glide through eyelets on the first attempt instead of catching and fraying.
Full walkthrough: replacing a lost drawstring start to finish
Here’s the complete process, whether you’re dealing with a fully missing cord or just want to redo the job properly.
- Remove any remaining cord. Pull out whatever’s left from both eyelets so you’re working with a clear channel.
- Inspect the channel. Check for tears, lint clumps, or a stray security stitch blocking one end. Clear anything you find before threading.
- Pick your tool. Straw and stapler for speed, safety pin or bodkin for reliability, cable or coat hanger for thicker replacement cord.
- Thread through fully. Feed your chosen tool through one eyelet, out the other, then pull the cord the rest of the way until both ends hang even.
- Centre the cord. Adjust it so equal lengths hang from each side of the hood opening.
- Secure the ends. Knot each tip, add cord locks, or heat-seal synthetic ends so the cord can’t slip back into the channel.
- Test it. Pull the hood drawstring snug and release it a few times to confirm smooth movement through both eyelets.
- Resew if needed. If your hoodie has a centre security stitch holding the cord in place, restitch it by hand once the cord is centred and tested.
Budget five to ten minutes for the full job if you’re starting from scratch, less if you’re only swapping the cord in an otherwise intact channel. Most of that time goes into finding and prepping your tool, not the actual threading.
How to secure the string so it doesn’t get lost again
A cord that slides back inside the hood the moment you let go is the most common repeat complaint, and it’s an easy one to prevent.
- Tie a simple overhand knot at each end, sized larger than the eyelet opening so it physically can’t slip through.
- Add cord locks instead of, or alongside, knots. They grip the cord under tension and release with a squeeze, which beats retying a knot every wash.
- Resew the hood’s centre security stitch by hand if it’s missing or torn. A few tight stitches over the cord’s midpoint keep it from migrating to one side.
- Before laundering, tie the cord ends together or tuck the drawstring fully inside the hood. A washing machine’s agitation is the number one cause of a drawstring working its way back into the channel.
Pro Tip: If your hoodie never had a security stitch, add one. It takes under a minute with a needle and thread and solves the “vanishing drawstring” problem for good.
When the channel itself needs repair
Sometimes the drawstring isn’t the problem. A torn channel or a jammed security stitch will defeat even a perfect rethreading technique.
- Check for small tears along the channel’s inner seam, usually near the eyelets where tension is highest.
- If a factory security stitch is blocking your tool, snip it carefully with small scissors, thread the cord, then resew it by hand once the cord is centred.
- A few hand stitches along a torn edge, using thread that matches the fabric weight, usually stops a small tear from spreading.
- If the channel fabric has worn through or the eyelets have torn loose from the hood, that’s a job for a tailor or a case for retiring the hoodie. Extensive damage to the channel lining rarely holds a clean repair.
Author perspective and field notes from Plaid Gorilla Golf
Articles on some apparel blogs spend a lot of time on hoodie construction, particularly GSM (grams per square metre) and how it affects everything from drape to drawstring channel width. That’s not trivia. A heavier hood needs a different approach than a thin cotton one.
On our double-layer hoods, a thin cotton drawstring can feel loose and slide unevenly because the channel itself is wider to accommodate the extra fabric layer. A thicker round cord or light paracord tracks straighter through that wider channel and holds its shape better after repeated tightening.
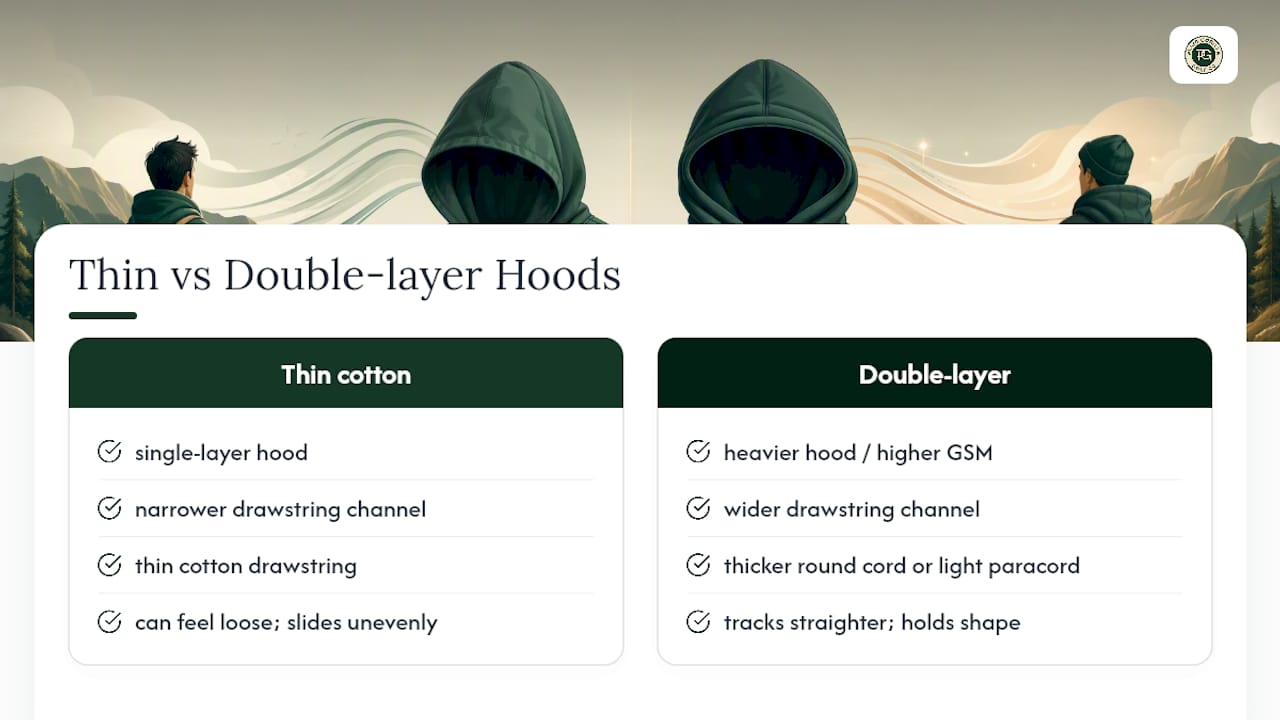
Threading technique shifts too. A straw can bend before it clears a double-layer channel, so some prefer to reach for a coat-hanger fid or a stiff-tipped paracord on anything built with heavier fleece.
What actually matters when your drawstring goes missing
Most drawstring advice online treats every hoodie the same, and that’s where it falls short. A thin cotton hoodie and a heavyweight double-layer hood need different cord thicknesses and, honestly, different tools. The straw trick is genuinely the fastest fix for lightweight garments, but it’s the wrong first move on anything built with a wider, reinforced channel.
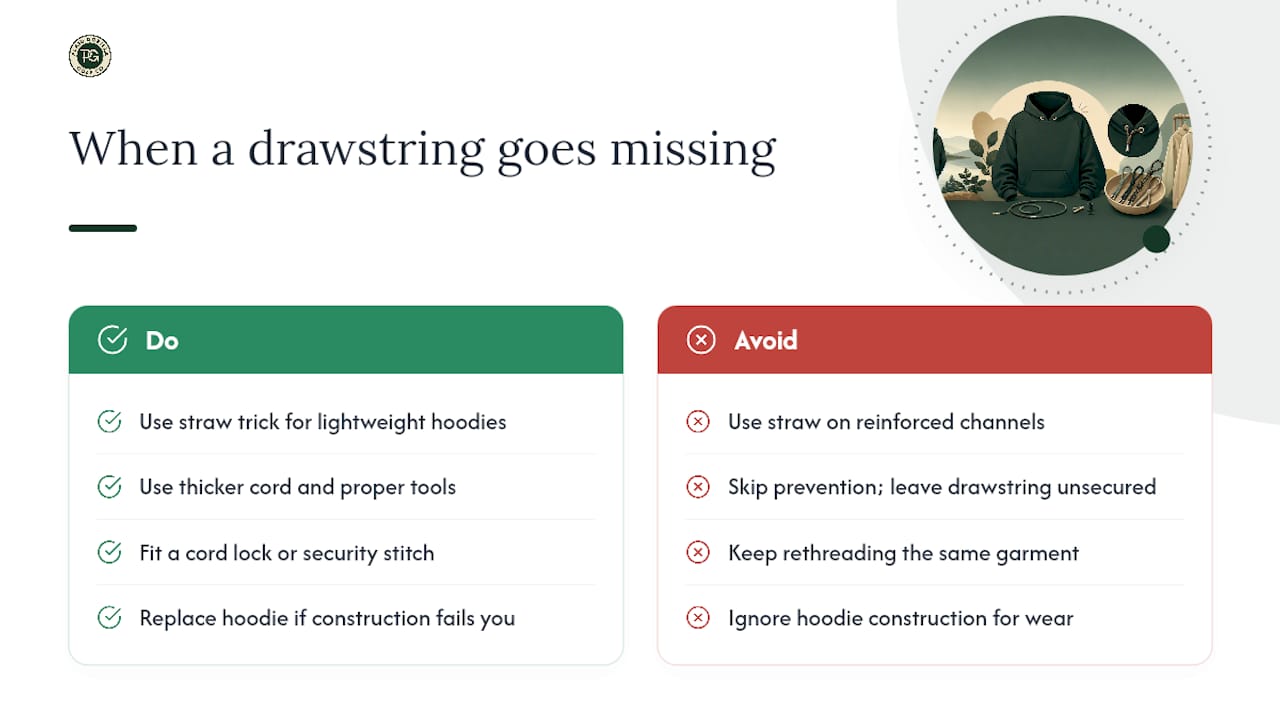
The bigger issue people underestimate is prevention, not repair. A cord lock or a proper security stitch costs you two minutes once and saves you from ever doing this again. Most people skip that step and end up rethreading the same hoodie three times a year.
If you’re constantly fixing the same drawstring, that’s a sign the garment’s construction, not your technique, is the problem. At some point, replacing a hoodie with one built for the way you actually wear it beats another round of straw-and-stapler.
— Mike
Get a hoodie built so you rarely need this guide again
If you’d rather not keep fixing a drawstring at all, some brands build hoodies with cord and channel construction that holds up to regular tightening and washing, instead of leaving you hunting for a straw every few months.

The Bogey Enthusiast Hoodie in Pine and the Prime Hoodie in Real Teal both use a cord and channel setup designed for the heavier, double-layer hood weight we talked about above. If you want the full look, The Bogey Kit pairs the hoodie with a Country Club hat, and The Course Kit bundles a Rope Hat with the Prime Hoodie at a better combined price than buying each piece on its own.
Browse the current drop and pick the piece that fits your closet, then check it out before the size runs out.
Sources
- How to rethread a drawstring with a straw (Lifehacker)
- How to Replace a Hoodie Drawstring (iFixit)
- How to rethread a drawstring in less than 60 seconds (Art of Manliness)
- How to Replace Drawstrings on Hoodies and Sweatpants (Paracord Planet)
FAQ
How do I replace a drawstring on a hoodie?
Feed a straw stapled to the cord’s end through one eyelet, bunching the fabric as you push it through the channel, then pull it out the other side. A safety pin works the same way if you don’t have a straw.
Is it possible to put the drawstring back in a hoodie?
Yes. Rethreading a drawstring that’s slipped fully inside the hood uses the same straw or safety-pin technique, just starting from whichever eyelet the cord is closest to.
How do I fix a hoodie drawstring that keeps slipping out?
Tie a knot at each end larger than the eyelet opening, or add a cord lock, so the cord physically can’t retreat into the channel. Resewing the hood’s centre security stitch stops it from shifting to one side.
What tool can I use to replace hoodie strings?
A straw and stapler is the fastest option, followed by a safety pin or bodkin. A charging cable, wire coat hanger, or paperclip all work as backups when those aren’t available.