


Choose chenille for large, tactile varsity-style emblems that need to read from across a parking lot. Choose embroidered patches for fine detail, small logos, or anything that hits the washing machine every week. Need both bold texture and crisp text in one badge? That’s what a hybrid patch is for, and most collegiate and mascot designs already use one.
TL;DR:
- Chenille patches are most effective for large, bold designs on heavyweight garments like varsity jackets and statement hoodies, where tactile presence is key.
- Embroidery offers better resolution for small text, fine logos, and layered details, making it ideal for frequent-wash garments like uniforms, polos, and caps.
- True chenille requires dedicated industrial equipment, and its cost primarily depends on size and manual handling, while embroidery costs are driven by stitch count and digitizing complexity.
- Durability under repeated washing favors embroidery, as its flat stitches resist abrasion better than chenille’s raised pile, which can fray or flatten over time.
- Hybrid patches combine chenille for large shapes with embroidery for fine details, but they come at a higher cost and require careful trimming to maintain a clean appearance.
Table of Contents
- Chenille patch vs embroidery: what chenille actually is
- Chenille patch vs embroidery: what embroidered patches offer
- How each patch gets made: manufacturing and digitizing compared
- Texture, detail, cost, and durability: side-by-side comparison
- When a hybrid patch beats picking just one
- How to choose the right patch: checklist and supplier questions
- What this looks like on real apparel
- What chenille patches are, in plain terms
- What embroidered patches are, in plain terms
- How chenille patches actually get built
- Chenille vs embroidery: the differences that actually decide your choice
- What drives the price on each type of patch
- Where each patch style earns its keep
- Which patch lasts longer, and how to keep it that way
- Design perspective: texture as a brand signal
- See how Plaid Gorilla Golf puts these patches to work
- Sources
- FAQ
Chenille patch vs embroidery: what chenille actually is
Chenille is the fuzzy, raised patch you remember from varsity jackets and old letterman cardigans. It’s built by looping yarn onto a felt base, then locking that loop down with a moss stitch or a chain stitch, the two techniques that give chenille its signature pile. The result isn’t flat. You can run your thumb across it and feel the texture, which is exactly why it works on heavyweight garments where a patch needs presence, not just accuracy.
Base fabric matters more than most buyers realize. Felt is the standard because it holds the loop structure without sagging, though twill shows up on lighter chenille work where a bit less bulk is needed. Either way, chenille reads best big. A crest, a mascot letter, a bold number, a team initial, these are chenille’s home turf.
- Best suited to varsity jackets, heavyweight hoodies, statement snapbacks, and teamwear where the patch is the focal point
- Works from a distance because the pile catches light and shadow differently than flat stitching
- Struggles with anything intricate: tiny text, thin outlines, or layered detail gets lost in the loops
Design limits are worth memorizing before you send art to a manufacturer. Anything under roughly 3mm in line thickness won’t render cleanly in chenille, so fine script or small icons need a different approach entirely. Chenille rewards confident, chunky design. It punishes fussy, detailed art almost every time.
Chenille patch vs embroidery: what embroidered patches offer
Embroidery is the workhorse of custom apparel branding, and there’s a reason it dominates uniforms, corporate polos, and every ball cap you’ve ever seen with a team logo. It’s built from flat thread stitched directly onto fabric using three core stitch types: satin stitch for clean borders and lettering, fill stitch for larger coloured areas, and running stitch for thin outlines or fine linework. A digitizer converts your artwork into a stitch file the machine can actually read, mapping out stitch direction, density, and colour breaks before a single needle drops.
That digitizing step is where embroidery earns its reputation for precision. Because the stitch path is programmed rather than eyeballed, embroidery renders small text, fine logos, and layered detail far more reliably than chenille ever will.
- Handles small text, thin lines, and detailed logos without losing legibility
- Holds up well through repeated washing, which is why uniforms and workwear lean on it almost exclusively
- Works on lighter fabrics that chenille’s bulk would overwhelm, including caps, polos, and dress shirts
- Delivers a flatter, more polished look rather than chenille’s raised, tactile finish
Where embroidery falls short is texture. It’s crisp and legible, but it doesn’t have the plush, dimensional presence chenille brings to a jacket back or a hoodie chest panel. If the job calls for a statement piece rather than a functional mark, embroidery alone can feel a little flat.
How each patch gets made: manufacturing and digitizing compared
Understanding production steps helps you ask smarter questions when you’re vetting a supplier, and it explains why one method costs more in certain situations.
Chenille production generally follows this sequence:
- Artwork gets simplified into bold shapes, since fine detail won’t survive the loop stitch
- A felt base is prepared and stabilized to hold the yarn without distorting
- Moss stitch or chain stitch lays down the looped pile in sections
- A satin-stitched border locks the edges and keeps the pile from unravelling
- The patch is trimmed, and sometimes sealed with fray-check or a light adhesive for extra hold
Embroidery follows a different path:
- Artwork is digitized into a stitch file, mapping stitch type, density, and colour sequence
- The design is hooped with an appropriate stabilizer, usually cut-away for dense or detailed work
- Multi-head machines stitch out the design, often across dozens of patches at once for volume orders
- Borders are finished with a merrowed edge or a hot-cut outline depending on the look you want
One detail buyers often miss: true chenille usually needs a dedicated chenille head or a commercial combo machine. Most home embroidery machines can only fake the look using layered fabric techniques, known as faux chenille, which can work for prototypes but rarely matches the real thing without extra finishing work.
Pro Tip: Ask any chenille supplier whether they’re running true looped chenille or faux chenille off a standard embroidery machine. The answer changes your price, your turnaround, and how convincing the final texture will look.
Stabilizer choice and hooping also matter more than people expect. Cut-away stabilizers and sturdy base fabrics keep chenille’s dense stitching stable, and magnetic hooping systems can make a real difference when you’re hooping thick fabric stacks for either method.
Texture, detail, cost, and durability: side-by-side comparison
Here’s how the two methods stack up across the factors that actually drive a buying decision.
| Factor | Chenille | Embroidery |
|---|---|---|
| Texture and visual effect | Plush, raised, reads boldly from a distance | Flat, crisp, reads clearly up close |
| Detail resolution | Struggles below roughly 3mm line thickness | Handles fine text and thin outlines reliably |
| Typical cost drivers | Size, colour changes, and manual handling | Stitch count, digitizing complexity, and thread density |
| Best garment pairing | Heavyweight cotton, fleece, twill jackets | Lightweight cotton, caps, twill, technical fabrics |
| Durability under washing | Pile is exposed to abrasion, more prone to wear | Holds up better through frequent laundering |
Viewing distance changes everything about how these patches perform. Chenille’s whole appeal is the way it catches light at a glance, so it earns its keep on a jacket back or a hoodie front where someone’s reading it from six feet away. Embroidery wins the close-up test instead, holding sharp edges on a cap or a chest logo where someone’s standing right next to you.
Cost doesn’t split as cleanly as most buyers assume. Chenille pricing tends to track size and the amount of manual handling a design demands, since more colour changes mean more setup time. Embroidery pricing tracks stitch count and digitizing complexity, so a dense, highly detailed logo can cost more to embroider than a simple chenille crest costs to produce. Neither method wins on price across the board. Get matched quotes for your specific design before assuming one is cheaper.
Laundering is where the gap widens the most. Embroidered patches generally hold up better against repeated washing because the flat stitch has less surface exposed to friction. Chenille’s raised pile is the whole point aesthetically, but that same pile takes more abrasion in a dryer or against a backpack strap over time.
- Chenille pairs best with jacket backs, hoodie front panels, and structured caps where the patch has room to breathe
- Embroidery pairs best with polos, dress shirts, caps, and any garment that sees frequent washing
- Mixed-fabric garments sometimes call for a hybrid patch rather than forcing one method to do a job it wasn’t built for
When a hybrid patch beats picking just one
Some designs genuinely need both. A mascot badge with a big furry-textured head and small embroidered lettering underneath is a hybrid by necessity, not by choice. Hybrid construction uses chenille to fill the large bold shapes, then adds embroidered outlines, text, and fine detail on top so nothing gets lost in the loops.
The design rule is simple: reserve chenille for large fills and save embroidery for anything under roughly 3mm, including small text, thin borders, and layered detail work. Trying to force fine linework into chenille almost always ends up illegible.
- Collegiate letter patches with an embroidered year or program name underneath the chenille letter
- Mascot badges combining a chenille body with embroidered facial features or lettering
- Retail centrepiece emblems that pair a bold chenille shape with embroidered secondary branding for clarity
Expect a modest cost premium on hybrids since they require two production passes instead of one, plus careful trimming and edge sealing to keep both textures looking clean where they meet.
Pro Tip: If your design has one big shape and one small detail, don’t force a single method to do both jobs. A hybrid costs a little more but looks dramatically more finished than chenille straining to render fine text.
How to choose the right patch: checklist and supplier questions
Match your patch method to three things: how the garment gets washed, how far away people will view it, and how fine your design detail actually is.
- Define the viewing distance. A varsity jacket back reads from across a room; a cap logo reads from arm’s length. Bold, distant designs lean chenille. Detailed, close-up designs lean embroidery.
- Check your smallest detail. If any line, letter, or shape falls under about 3mm, plan for embroidery or a hybrid rather than pure chenille.
- Consider wash frequency. Uniforms, workwear, and daily-wear caps favour embroidery’s durability. Occasional-wear jackets and statement hoodies can carry chenille’s higher-maintenance texture.
- Match the fabric weight. Heavyweight cotton and fleece support chenille’s bulk. Lightweight cotton, twill, and technical fabrics do better with embroidery.
- Get quotes for both methods before committing, since cost doesn’t always favour the method you’d expect.
When you’re vetting a supplier, ask direct questions rather than trusting a glossy product photo:
- Do you produce true looped chenille, or faux chenille off a standard embroidery machine?
- What’s your minimum size for chenille detail, and can you show a sample at that size?
- What are your digitizing fees, and are they a flat rate or per design?
- What backing options do you offer, and what’s your typical turnaround?
- Can I see a physical sample before committing to a full order?
Care instructions differ by method, and skipping them shortens a patch’s life fast. Wash chenille garments on a gentle cycle, avoid high-heat drying, and keep the patch away from abrasive contact like backpack straps or rough zippers. Embroidered patches tolerate washing better overall, but they still last longer with cold water and air drying rather than repeated high-heat cycles. For more on keeping patched headwear looking sharp, see this guide to cleaning golf hats without wrecking their shape or colour.
One red flag worth remembering: if a supplier promises tiny, intricate detail in true chenille, or refuses to send sample photos before you order, that’s a sign to keep shopping.
What this looks like on real apparel
Patch choice is a design decision, not an afterthought. A bold retail hoodie built for a statement drop often calls for chenille on the chest or back, big enough to read from across the clubhouse. A structured snapback, where the logo needs to stay sharp through sun, sweat, and repeated wear, is a better fit for embroidery.
- Chenille earns its spot on heavyweight hoodies and jacket-style pieces where texture is part of the story
- Embroidery earns its spot on caps and lighter panels where crisp detail and wash durability matter most
- Garment type should drive the decision before design preference does
For readers weighing puff embroidery against flatter builds on hats and hoodies, this breakdown of the 3mm rule for puff versus flat embroidery covers similar minimum-detail thinking. This article was compiled by Mike at Plaid Gorilla Golf, drawing on manufacturing sources and hands-on category knowledge from building limited-run apparel drops.
What chenille patches are, in plain terms
Chenille patches are raised, textured emblems made by looping yarn onto a felt base and locking it in with a moss or chain stitch. The word itself comes from the French term for caterpillar, a nod to the fuzzy, segmented look the pile creates once it’s finished. Visually, chenille patches sit somewhere between a badge and a piece of fabric art, thick enough to cast a small shadow, soft enough to touch.
They’ve been a fixture of North American varsity culture for decades, showing up on letterman jackets long before streetwear brands started borrowing the aesthetic for hoodies and caps. That history is part of why chenille still reads as “collegiate” or “retro” even on a brand-new product. The construction hasn’t changed much, but the applications have expanded well beyond athletic letters into mascots, crests, numerals, and full-width chest emblems.
What separates a chenille patch from a printed or embroidered graphic is dimensionality. You’re not looking at a flat image of a letter. You’re looking at a built-up, three-dimensional object stitched directly into the pile. That’s also why chenille patches tend to be reserved for bigger design elements rather than fine branding work, the construction method simply isn’t built for small.
What embroidered patches are, in plain terms
Embroidered patches are flat, stitched designs built from thread sewn directly onto a fabric or felt base, typically finished with a merrowed or hot-cut edge. Unlike chenille, there’s no looped pile involved. Every stitch lies flat against the surface, which is what gives embroidery its clean, professional look on uniforms, corporate wear, and branded caps.
The process starts with digitizing, converting a logo or design into a stitch file that tells the machine exactly where to place satin, fill, and running stitches. That level of control is what makes embroidery so reliable for small text and detailed artwork. It’s also why embroidery has become the default choice for anything that needs to look sharp at close range: name tags, chest logos, cap fronts, and team branding on daily-wear garments.
Embroidered patches can be sewn onto a garment afterward or stitched directly into the fabric during production, depending on the application. Either way, the appeal is consistency. Once a design is digitized correctly, it reproduces the same way across hundreds of units, which matters enormously for uniform programs and retail runs that need every piece to match.
How chenille patches actually get built
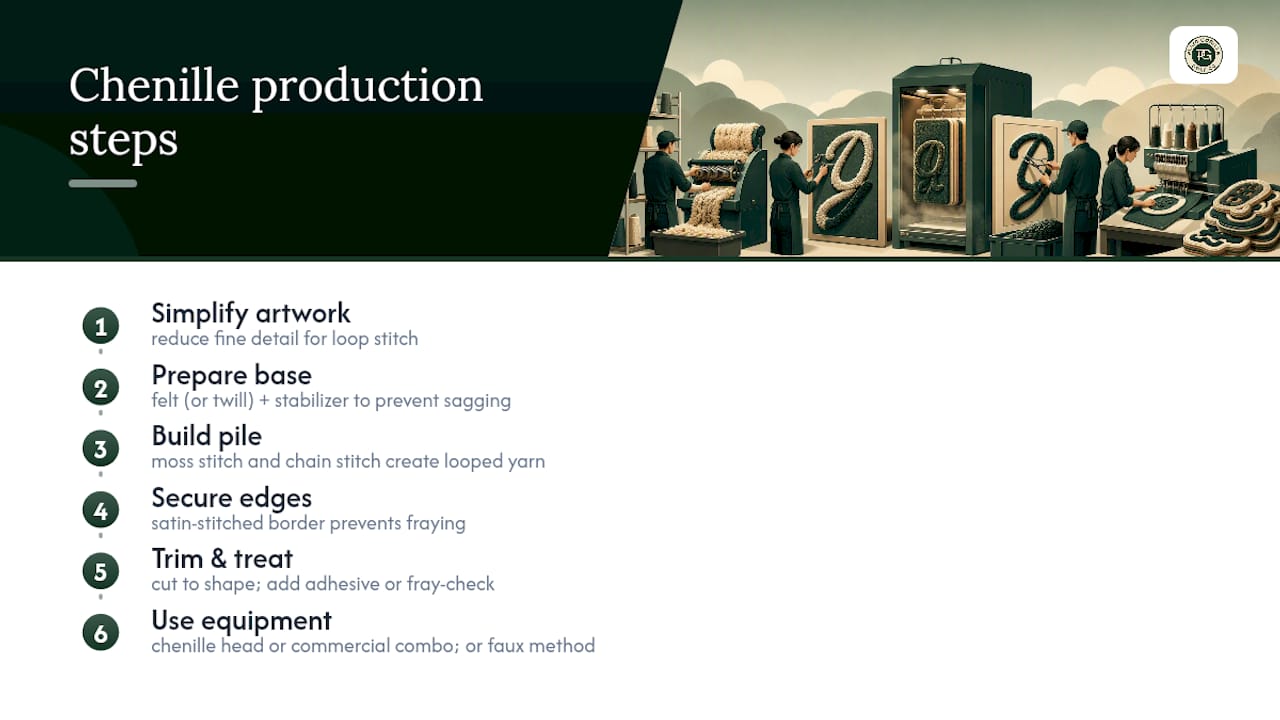
Chenille production starts with a simplified version of the artwork, since the loop stitch can’t hold fine detail the way flat embroidery can. From there, a felt base gets stabilized to support the dense stitching that follows. The two core techniques doing the actual work are moss stitch and chain stitch, both of which build up looped yarn in layers to create the raised pile chenille is known for.
Base fabric choice affects the final feel. Felt is the standard because it’s thick enough to anchor the loops without sagging under their weight, though some lighter chenille work uses twill instead. Stabilizer matters just as much. A cut-away stabilizer keeps the dense stitching from puckering or distorting the felt base during production.
Once the pile is built, a satin-stitched border locks everything down and prevents the loops from fraying loose over time. The patch gets trimmed to its final shape, and some manufacturers add a light adhesive or fray-check treatment along the edges for extra durability. This is also where equipment matters most: producing true chenille generally requires a dedicated chenille head or a commercial combo machine, which is why a lot of smaller shops fall back on faux chenille techniques using layered fabric instead of the real thing.
Chenille vs embroidery: the differences that actually decide your choice
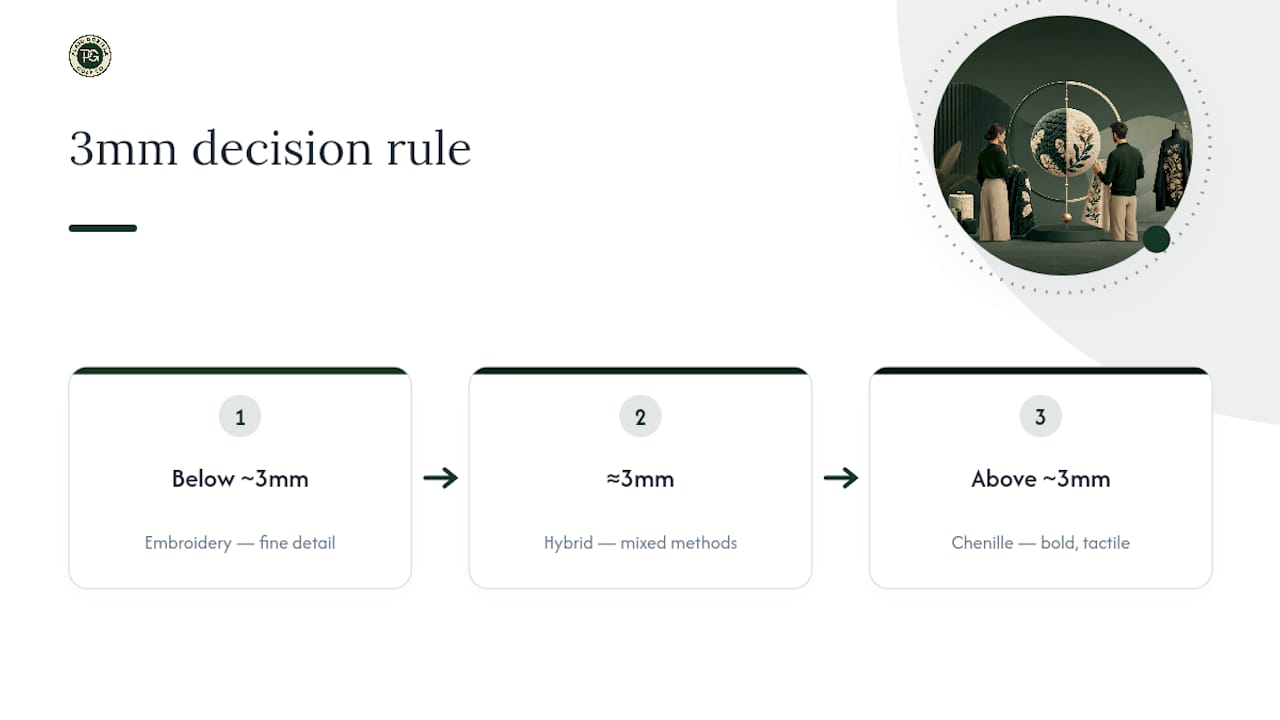
Texture versus detail is the core tension between these two methods, and almost every other difference flows from it. Chenille trades detail for presence: it can’t render fine lines, but nothing beats it for a bold, tactile statement piece. Embroidery trades texture for precision: it lies flat, but it can hold text and linework chenille simply can’t reproduce.
The practical dividing line is line thickness. Anything below roughly 3mm needs to be embroidery or part of a hybrid design, because chenille’s loop structure physically can’t resolve detail that fine. Above that threshold, chenille becomes a genuine option, and the bigger and bolder the shape, the better it performs.
Recommended sizing follows from that same rule. Chenille patches tend to start larger, often in the range used for varsity letters, full chest emblems, or jacket-back crests, because shrinking the design down forces the detail problem chenille wasn’t built to solve. Embroidery scales down comfortably to small cap logos and name embroidery without losing legibility, which is part of why it dominates smaller-format branding.
What drives the price on each type of patch
Cost breaks down differently depending on which method you’re pricing out, and understanding the difference helps you evaluate a quote instead of just comparing bottom-line numbers.
For embroidery, stitch count and digitizing complexity are the main cost drivers. A design with dense fill stitching, multiple colour changes, and fine detail requires more digitizing work and more thread, which pushes the price up even on a small patch. Simple, low-detail embroidery costs less almost regardless of size.
For chenille, size and handling matter more than stitch complexity. Because chenille designs tend to be bold and simple by necessity, the price scales more with the physical size of the patch and the number of colour or yarn changes required during production. A large single-colour chenille letter can actually cost less than a small, highly detailed embroidered logo, which surprises a lot of first-time buyers.
Yarn quality plays a role too, with higher-grade acrylic or wool-blend yarns holding their loop structure and colour better over time than budget alternatives. Neither method is reliably cheaper across the board. The smartest move is requesting quotes for both approaches on your specific design before locking in a decision.
Where each patch style earns its keep
Varsity jackets remain chenille’s signature application, and for good reason: the garment is heavyweight enough to support the patch’s bulk, and the aesthetic has always leaned bold and collegiate. Statement hoodies and streetwear drops have borrowed that same look, often putting one large chenille emblem front and centre as the entire design story.
Uniforms and functional branding belong to embroidery almost by default. Anything that needs consistent, close-up legibility, employee name tags, corporate polo logos, and team uniforms, benefits from embroidery’s flat finish and wash durability. Caps are another embroidery stronghold, since the curved, lightweight structure of most hats doesn’t suit chenille’s bulk well.
Fashion applications increasingly blend the two, using chenille for a centrepiece design and embroidery for supporting text or secondary branding. That combination shows up often on modern retail drops where a brand wants both visual impact and legible detail in the same piece. For more on how garment type should guide your decision, this comparison of hoodies versus quarter zips walks through how fabric weight and use case affect design choices generally.
Which patch lasts longer, and how to keep it that way
Durability comes down to how much surface area is exposed to friction, and chenille simply has more of it. The raised pile that makes chenille visually striking is also the part most vulnerable to abrasion from backpack straps, dryer tumbling, or rough contact against other fabric. Over years of regular wear, chenille patches can flatten, fray, or lose some of their loop structure.
Embroidered patches hold up to frequent washing noticeably better because the flat stitch has less to catch on. That’s a major reason embroidery dominates uniforms and daily-wear branding where garments see weekly or even daily laundering.
Extending the life of either type comes down to a few consistent habits: wash on a gentle cycle, skip high-heat drying, and turn patched garments inside out before they go in the machine. Chenille benefits from extra caution around abrasive contact, since even careful washing won’t undo years of rubbing against a rough surface. Embroidery is more forgiving, but cold water and air drying still add meaningful years to a well-stitched logo.
Design perspective: texture as a brand signal
Chenille says something embroidery can’t: nostalgia, weight, a collegiate pedigree. Brands leaning into that story put it front and centre, one bold emblem doing all the talking. Embroidery says something different, polish, precision, reliability, which is exactly why service-oriented and high-laundry items lean on it instead.
Neither is the “premium” choice by default. The right call depends on what story your price point is telling. A $200 varsity-style hoodie earns its price partly through chenille’s presence. A daily-wear cap earns trust through embroidery holding up wash after wash. Match the texture to the promise you’re making the customer, not the other way around.
— Mike
See how Plaid Gorilla Golf puts these patches to work
Reading about chenille and embroidery is one thing. Seeing them on a finished piece is another, and that’s where Some apparel drops make the choice concrete rather than theoretical.
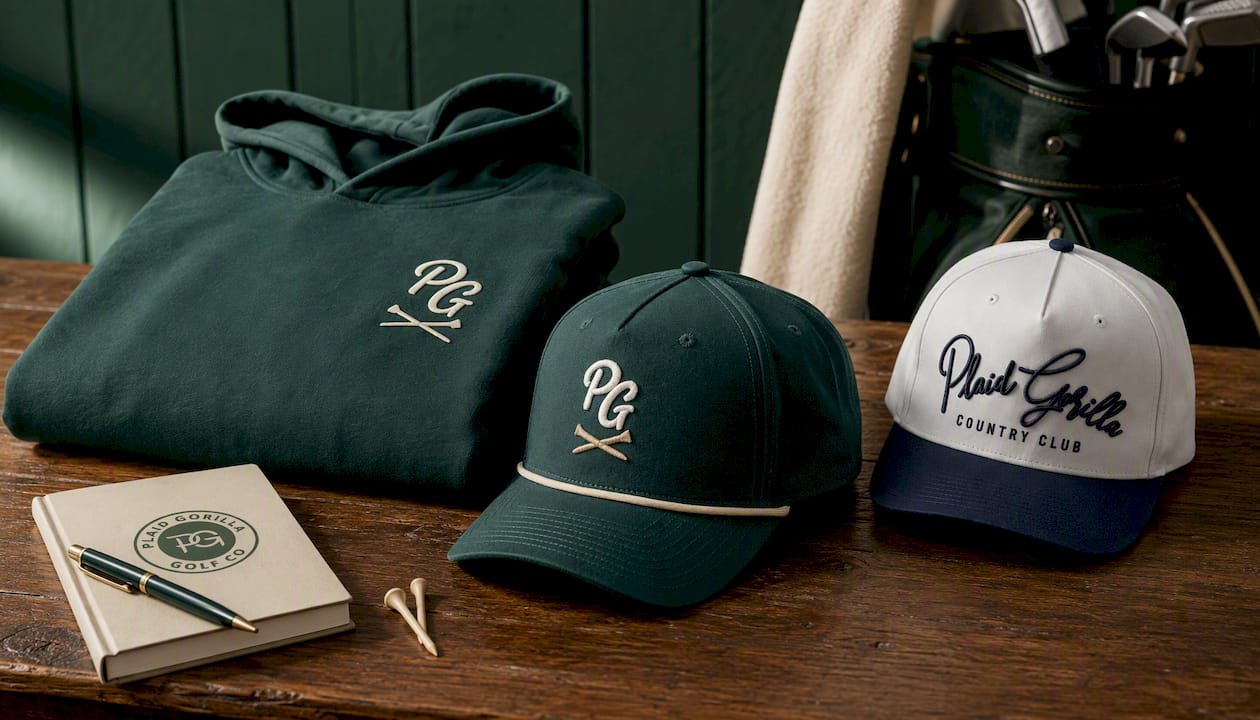
The Champagne Tees Rope Hat in Ponderosa Pine shows embroidery doing exactly what it does best: crisp, small-format branding on a structured cap that needs to hold up to sun and sweat. The Country Club Snapback in Navy and Cloud White is another good look at how embroidery reads on a curved panel where fine detail actually matters. And for anyone weighing texture on a heavier garment, The Bogey Kit pairing a Country Club hat with the Bogey Enthusiast Hoodie is a practical example of how a bundle can mix crisp cap branding with bolder chest-panel treatment on the hoodie side.
Golf apparel doesn’t have to choose between quality and personality. If you’re weighing your own patch decision for a project, browsing the Golf Hats or Golf Hoodies collections is a solid way to see how texture, detail, and garment weight play out on finished pieces. Check the collections, pick the piece that matches your look, and see the difference in person.
Sources
The technical claims in this article draw on manufacturing and craft guides that go deep into stitch types, digitizing, and material choices:
- How to Make Chenille Patches: The Professional Manufacturing Process
- How to make chenille patches with your embroidery machine: a complete guide
- Custompatchfactory
Readers ordering patched apparel may also find the team golf outfit formulas guide useful for coordinating branded pieces across a group.
FAQ
What is the difference between embroidery and patches?
Embroidery is a stitching technique applied directly to a garment or to a separate patch, while a “patch” is the finished piece, whether chenille, embroidered, or another method, that gets attached afterward. In practice, most people asking this question mean chenille versus embroidered patches specifically, and the difference comes down to texture: chenille is raised and plush, embroidery is flat and detailed.
What are chenille patches used for?
Chenille patches are best suited to large, bold designs on heavyweight garments like varsity jackets, statement hoodies, and structured caps. They’re the go-to choice for letters, mascots, crests, and numerals where visual impact from a distance matters more than fine detail.
What kind of machine do you need to make chenille patches?
True looped chenille generally requires a dedicated chenille head or a commercial combo machine. Standard home embroidery machines can only produce faux chenille using layered fabric techniques, which looks different from true chenille and often needs extra finishing to pass as the real thing.
How much do chenille patches cost?
Chenille pricing is driven mainly by size and handling rather than design complexity, since chenille designs tend to be bold and simple by necessity. Getting matched quotes for both chenille and embroidery on your specific design is the most reliable way to compare actual costs, since neither method is consistently cheaper.
Should I choose chenille or embroidery for a hoodie?
It depends on the design: chenille suits a large, single focal emblem on a heavyweight hoodie, while embroidery suits smaller logos or text that need to stay sharp through frequent washing. Plaid Gorilla Golf’s Golf Hoodies collection shows both approaches applied to real retail pieces.